


Archero, formerly known as Archer Heroes, is a hugely popular roguelike where you use bows, arrows, and other long-range weapons exclusively against little enemies, minibosses, and big bosses alike. The biggest and baddest bosses of all are the ones on the final stage of each chapter.


You need the perfect combination of strategy, upgrades, and sheer strength in order to beat each of these bosses – some more than others, since some bosses are only a little bit difficult and some of them are INSANELY difficult. So read on for a guide on how to beat all of Archero’s chapter bosses!

Complete Archero Guides:
Before you fight the boss:
There are a few factors that go into every single boss that you fight, especially when you get past chapter 1. One is how many talents you unlock. Talents give you a boost right from the beginning of the level, and can be unlocked by increasing your player level. So good old-fashioned grinding certainly helps in these boss battles.
Another is to think of the power-ups that you can earn, or skills and abilities. For all but one or two of these bosses, the multi-enemy damage bonuses will do almost nothing to the bosses. Some abilities, such as stat boosts, multishot (one shot after the other), and more, will help greatly in your fights against the bosses in this game.
Unlike most RPGs, incremental damage, such as poison and fire, actually works against bosses, too. So once you find an upgrade that does either fire damage or poison damage (or more importantly, one of each), take them and use them to consistently drain boss health.
Equip the right weapon for the fight. Typically that is the weapon with the highest upgrade level. If they are all pretty close in level, the Tornado (AKA, the boomerang) tends to be the best as it can do damage twice – once on the initial attack and once as it’s coming back to you. But other than that, go with the highest-level weapon.
Now that we have the weapons and the abilities/skills/power-ups out of the way, here’s how to beat all of the bosses, both in text and in video form.
How To Win Every Boss Battle in Archero (UPDATED)
This goes for the final bosses of every chapter plus a particularly tough miniboss in level 1.
Materials
- Your favorite phone or tablet
Tools
- Highly upgraded weapons, talents, pets, and skills
Instructions
Additional tips for boss-beating:
Use hit and run tactics always. Staying safe is more important than dealing damage.
Watch the patterns of every boss’s attacks, look for similarities, avoid the attacks, and attack when safe.
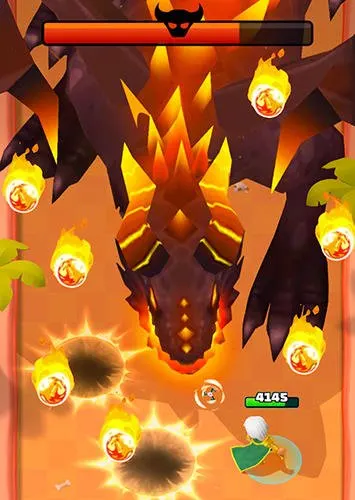
Chapter 1 is the Verdant Prairie. The Prairie’s first boss is easy compared to the other final bosses, but it’s still insanely difficult to beat if you’re a newbie to the game. This is the red fat dragon that shoots ricocheting fireballs everywhere.
The key to beating this one is to avoid the fireballs, but that can be a bit tough to do when you have a ton of fireballs on screen at the same time.
Avoid and shoot, but be sure to prepare for the boss by going for the right upgrades when you’re playing prior stages in Verdant. The best ugprade is double shot; other than that, maximize your HP, your attack power, and your attack speed when playing against it.


Most Popular: Triumph Brick Breaker Cash: The Full Promo/Referral Code List and Guide for Free Money
Verdant Prairie’s final boss is a series of warping golems. You have to deal with a blue one and a black one. They’re fast, and they attack rapidly, so concentrate on both of them, not just one of them.
Upgrade-wise, the previously-mentioned upgrades are best, but in addition, all of the “orb” upgrades that make damage orbs fly around you will be very effective due to how mobile they are. If they run into your orbs, they’re screwed and they’ll lose a ton of energy.
Focus on defeating one of them at a time, because the quicker you defeat one, the faster you’ll have to deal with less attacks total. Then deal with only the other golem, and it will be easy to do.
Chapter 2 is Storm Desert. This level’s boss will stand still and aim three homing shots, so watch out for the wide red lines and stay out of them in order to avoid getting hit. Stand still to get off a number of shots.
Then it will start shooting from the hip and firing multiple shots randomly all over the place. You’ll have to stay a bit more mobile here, so that you can avoid them. Stand still when you can to get lots of shots off.
Orbs are mostly useless against this boss. Single enemy power-ups such as double shots, attack boosts, and attack speed boosts, are best here. The usual HP boosts are also a good idea. Too many range-damage power-ups are also no good against this boss, though they can help you get to the boss faster.
Chapter 3 is the Crystal Mines. This boss is a gigantic dragon that will make mincemeat out of you quickly with a row of shots that will cover most of the screen. Run to the one or two rows that aren’t getting wasted by shots.
Then after that, the dragon will release a bunch of random bullets, so you just have to use speed to avoid those. Stop and shoot when you can.
Being that this is a HUGE boss, combine wall bounces and piercing shots to do damage multiple times per shot. HP is good, as are attack power and speed. Diagonal arrows are useless. Orbs are useless. Multishot is good.
Chapter 4 is the fire version of the Crystal Mines. The boss here is a small wyvern-esque flyer that spams homing fireballs at you, and they’re VERY difficult to avoid, although avoiding them is not impossible.
It also uses a dash attack. Save your revives for the boss, and earlier in the chapter, use defensive upgrades to prepare for the boss, because they’ll be needed later on to deal with the projectiles.
Wingman abilities and orbs work great in this one, because the boss is extremely mobile, so it will run into your orbs constantly. Also, your wingmen will position themselves automatically to attack, but they won’t take damage, making them a useful asset.
Chapter 5 is the Lost Castle. The boss here, surprisingly, is actually a lot easier to beat than the other bosses, or at least much simpler. It charges at you fast but it doesn’t shoot projectiles. So you have to stay on the move and attack VERY quickly.
You might only have the chance to launch one shot at a time, so attack speed is a great one to increase. Orbs and wingmen are the best upgrades so that they can do damage without you having to stop, though. And as always, boost those HP before you fight against Chapter 5’s boss.
Chapter 6 is also known as the Ossuary Desert. The Ossuary Desert’s boss is a fire serpent, and due to a weird glitch in the programming of the game, it’s EXTREMELY easy to beat if you know what you’re doing. You have to deal with fire sprays and with the serpent permanently setting the ground on fire.
But it’s easy to beat because it doesn’t move. Stand in the same spot that the serpent spawns in and NONE of its attack will be able to hit you. Keep doing this every time it regenerates until you drain all of its health. It won’t be able to touch you.
Chapter 7 is the Silent Expanse. This region’s boss is a small and ridiculous boss that constantly warps around and shoots multiple projectiles at a time. You have to stay on the move, but there are breaks in between shooting, so stop but don’t plan on staying stopped for too long because this enemy is fast.
There is only one boss here, so the best upgrades are straightforward attack power and speed boosts. Being that it moves around so much, wingmen and orbs are useful. Side arrows and multishots are useless.
Chapter 8 is the Frozen Pinnacle. The boss looks a bit like a skeleton in drag. This boss charges at you, jumps at you, and sets the ground on fire. Essentially, it throws at you everything but the kitchen sink.
The two main attacks are dashing and splash damage attacks, so you have to be fast, but you also have to know the timing of when the shot’s explosion is gong to happen.
To best deal with this one, be straightforward with upgrades. Orbs and wingmen are best, especially orbs due to how often the enemy moves close to you.
Chapter 9 is the Dungeon of Traps. The final boss of this dungeon is an ice bird that teleports and uses mainly a full-surround spray attack. But the spray is not that hard to defeat because it doesn’t come too often.
So for that reason you don’t really need projectile defense against this one. All that you need are a good sense of being able to run away from attacks, and if you’re at this chapter, you already know how. The only useless upgrades are multi-shot because there is one boss character.
Chapter 10 is the Cave of Bones. The boss here is a giant dark dragon that looks like a clone of chapter 3’s huge dragon, but seems to attack a lot less. The boss is horribly anticlimactic, as you can see in the video above.
By this point, you’ll be launching off more attacks than on the final level of a bullet hell game. So beat it and avoid whatever you can and you’ll easily win.
MilitaryGirl
Tuesday 12th of April 2022
(0:3>>ujeb.se/eTflAZ
cbd shop camden
Thursday 9th of December 2021
Hello everyone , can anyone recommend where I can buy vib CBD?
colleenoneillmakeup.com